Monday, November 12, 2012

Candylicious Cookies


Hello All!

I hope everyone had a fabulous weekend filled with fall weather.  I am so excited the temperature is finally cooling down so I can start pulling out my scarf collection!  
My week was an extremely hard one that just called for some chocolate healing!  I decided I needed the sugar NOW so I made my super easy Chocolate Snickers Cookie!

This Cookie takes no time at all! Great for kids or adults.


What You Need:


-Chocolate Chip Cookie Dough (30 oz package)  

-Bag of mini Snickers (12 bars cut up into bite size pieces) 


Directions:

1. Press cookie dough into a greased 9 by 13 inch pan.  

2. Bake at 350 for 15 minutes. Take cookie out of oven and sprinkle the cut up Snickers all over the cookie and return to the oven FAST to continue baking for another 10 to 15 minutes depending on oven. 

(OPTION) You can cook cookie through and then add snickers after fully cooked.  The cookie is to be undercooked and all sorts of gooey goodness! This is totally up to the baker! 

Everyone enjoy the sugar coma! 

Friday, November 2, 2012

Spooktacular Cookie


Hey there bloggers! 


I hope everyone had a fantastic Halloween! 

I wanted to make a sweet treat for my neighbors and friends at Halloween parties.  I needed something to travel easily and not break the bank.  I had all the supplies at home so this seemed to be my best bet!!

I have to confess...this isn't my recipie.  I found it online and added my own touch of Halloween! 

What You Need:
-2 1/8 cups flour

-1/2 tsp salt
-1/2 tsp baking soda

-12 TBSPs butter (1 1/2 sticks), melted and cooled slightly

-1 cup brown sugar

-1/2 cup white sugar
-1 large egg
1 large egg yolk

-2 tsps vanilla extract
-1 12oz bag M&M's, divided


Directions: 
1. Preheat the oven to 325 and grease a 9 by 13 inch pan. 

2. Combine the Flour, Salt, and Baking soda together and set aside.

3. Blend the melted butter and sugars together until well combined.  

4. Add the egg, egg yoke, and vanilla until blended together.

5. Gradually add the dry ingredients to the wet ingredients. (Remember don't over mix!)

6. Fold in 1 cup of M&M's or until you think it looks decedent enough. 

7. Put batter into the greased pan and top with extra M&M's (Push the M&M's slightly down)


8. Bake for 25 minutes or until the top turns a little golden brown. 


You can add really anything to this recipe: toffee, multiple chocolate candies, candy bars, nuts. Left over Halloween candy would be great to throw in here.

 Let your imagination run wild!!

I hope you all enjoy this very large and delicious cookie.  I know mine won't be around very long!!

Monday, October 29, 2012

Halloween Extras!!!


Living on a budget doesn't have to be colorless!

I absolutely love decorating for every single holiday and you can be practical with decorating.  I need to save money for life, but entertaining is more than just having your friends over. It includes your house or apartment atmosphere.  


I have spiced up my apartment with old Halloween decorations and some kitchen towels and aprons to bring the spooky spirit to my living space.  

You can put towels out that are orange or maybe orange candy.  These are cheap ways to bring your dinner party to life.  My mom recently sent me an apron for Haloween and I decided to put it on an extra chair to bring some color to the dining area.  


You can buy cheap candles, candy or towels to spruce up the holidays when entertaining so you can focus on spending money on the food!!!


Monday, October 22, 2012

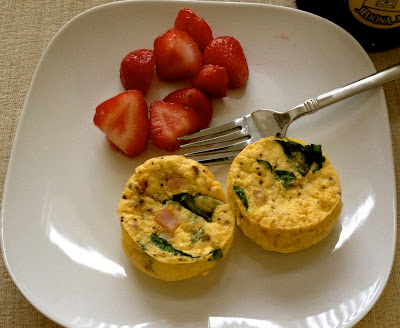
Egg Cupcakes


Happy Fall Bloggers!!

Lately I have found myself becoming more lazy in the morning and just wanting to eat right away so I had to accommodate my early morning hunger!  My mom use to make "Egg cupcakes" years ago and I decided it was time to bring them back into my life.  I am trying to eat a more balanced diet and this is a great way to start out the day!

You can make these with anything you would like but this is how I made them..


What You Need:

Egg Beaters

Canadian Bacon

Spinach

Cheese

Hot Sauce


How It works:

1. Combine in a large bowl all the ingredients you would like to have in your eggs.  

2. Add the Hot sauce and Spices last just to insure you don't go overboard!!

3. Measure out 1/3 of a cup of the egg mixture into a greased cupcake pan


4. Bake at 350 for 20-25 minutes.
 (These will rise but don't worry once out of the oven they will plop right down)


You can make this a project with morning guests and have each person make their own personalized egg cupcake or you can make a lot and freeze them like I do.  

This is a super easy way to warm breakfast up in the morning and a money saver! 

Enjoy your egg cupcakes!!

Thursday, October 11, 2012

No Bake Chocoholic Cookies


Hello Friends!

Since I have been living in Los Angeles for a couple of months now I realize that the weather is always perfect!  This time of the year for me usually means boots and sweatshirts, but now I am still in shorts and tank tops!  I wanted to bake some cookies for some of my friends, but didn't want to turn on the oven.  

I decided to whip up a batch of No Bake cookies.  What a great way to keep my apartment cool.. and remind me of my younger years.  Nothing says old school quite like No Bake chocolate cookies!

What You Need: 
·         2 cups sugar
·         4 tablespoons cocoa
·         1 stick butter
·         1/2 cup milk
·         1 cup peanut butter
·         1 tablespoon vanilla
·         3 cups oatmeal

Directions:
 1. In a sauce pan combine the Sugar, Cocoa, butter, and milk.  You will want to stir this so 
nothing burns.


2. Bring the combination to a boil and the trick is to let it boil for 2 or 3 minutes.


3. Take mixture off the heat and let set for a minute and then add the Peanut Butter, Vanilla, and Oatmeal.  


4. once all combined, make cookies as big or small as you would like and drop them on wax paper. I like to make my cookies big so I can tell myself I only ate  one cookie..I think it is a great chocoholic cooping mechanism  


*Trick* cookies will set faster if you put in the freezer or refrigerate right away.  


I don't have any baking bags to put the cookies in for my friends so I decided to use some parchment paper and ribbon from the scrap booking bag.  I also added a touch of sparkle with the miniature rhinestones.  Nothing says old school like bedazzling! 


This was a very cheap and easy way to show my friends I was thinking about them and appreciate them. 

This is also a great idea for party favors to give to the guests as they leave!

Enjoy the Chocolate and Rhinestones! Perfect combination in my book!  

Tuesday, September 18, 2012

Balls To Go...Cake Balls That Is!!!!


This past week I started my first real grown up job out of college so I decided to start it out on the right foot! 

I know everyone has a soft spot for sweets so I made Cake Balls, and not just ho hum cake balls, but the decedent red velevet with cream cheese frosting covered with chocolate candy coating.

These cake balls are very simple to make and look like they took you hours to make.  I have to admit the first couple of times it took me a bit longer than it does now.  You know what they say... practice makes perfect! My family loves when Ipractice making cake balls!!


Must Haves:
-Box cake mix
-Container of icing 16oz
-Candy Coating
-Tooth picks
-Wax Paper


Here are the simple steps:
1. Prepare the cake as it directs on the back of the box and bake in a 9 by 13 pan.  

2. Bake the cake for the directed time on the box and you will know when the cake is done by sticking a tooth pick in the center of the cake. If it comes out clean then you are good to go!


3. Let the cake cool completely and then cut it into fourths


4. You will crumble the cake with your hands a fourth at a time.  (this can get messy but very fun, make sure you have a BIG bowl!)


5. Put 3/4th of the can of icing in the bowl of crumbled cake and mix it around. ( This can also count as an arm workout!)


6. Roll the cake balls in a ball shape as big or small as you like. Put on a sheet of wax paper

7. Melt the candy coating and start dipping.  

8.*Trick* After you dip the balls you want to try and get off all the extra coating then put them back on the wax paper.  IMMEDIATELY take a tooth pick and go around the base of the cake ball to make sure it will come off the paper in a round shape!

- The toothpick will make a line between the candy coating drippings and the cake ball

-They dry right away so you won't need to wait long unless it is really hot at your house!


 If you want to make them special you can melt a different type of color and pipe with a ziplock a design or just go over it very fast like I did mine.  


I made a scrapbook label on the top of my container to add a little punch of cuteness!! This is a very cheap and easy way to say you care! 

I hope you all have some cake ball fun of your own... trust me when you make them, they won't be around long!

Enjoy baking PLUS craft time!!